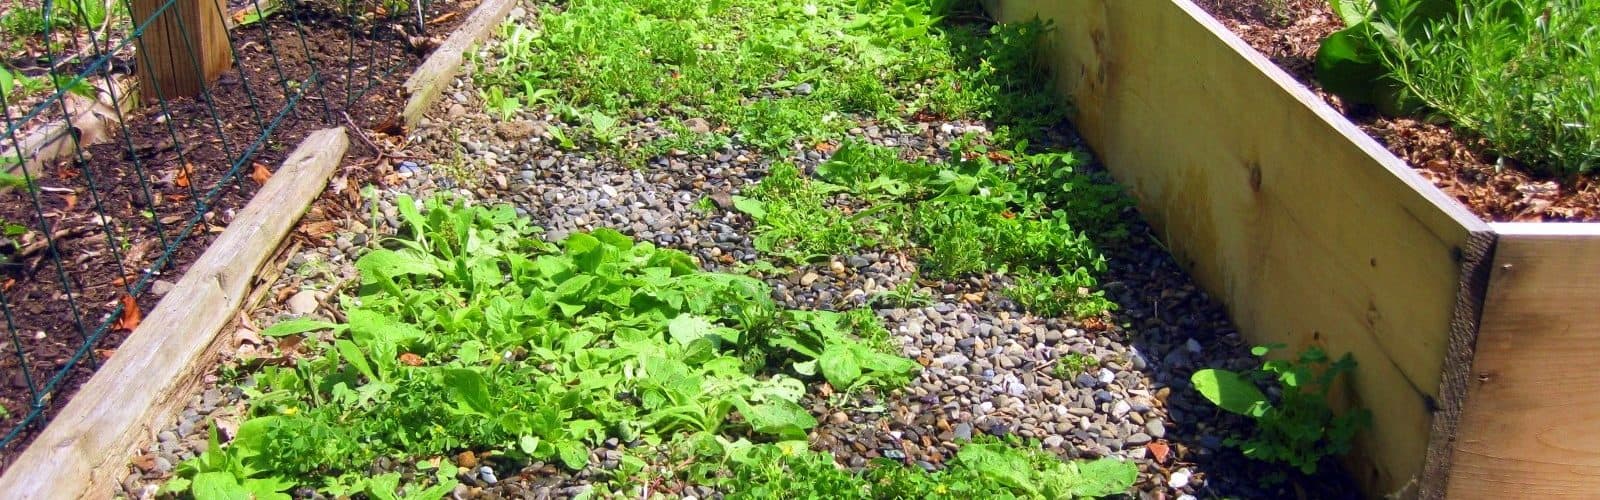
Spring is here, Time to work in the yard… Are weeds an issue? Here is the fix:
This project is fast and easy although it will require a bit of digging, But nearly anyone can do this.
There are only a few steps to completing this project, And you will need some materials and a few tools:
Here is a typical list:
- Enough landscaping timbers to go around the bed you wish to complete stacking them at least 3 timbers high, Just measure the length and width of all sides that you wish to install the timbers, In most cases on the sidewalk or walk path will need these timbers if your bed will be placed against the house or a building, You will need enough to go all the way around if your bed will be in the yard and not in contact with a house or building.
- Enough mulch or wood bark to fill the bed at least 3” thick (Length x Width x Depth)
- 24” pieces of ½” rebar (Will be used for stakes to hold the timbers in place) you will need at least 3 for a 10’ft timber
- Roll of “Landscaping Mat” or enough to cover your bed with 36” extra on all sides (If your bed is 3’ x 10’ you will need = 3’+3’+3’ Width x 3’+10’+3’ Length or 144 Square Foot
- Drill with 9/16” wood bit at least 6” long
- Drill
- Extension cord
- Shovel
- Gloves
- Shrubs
- Utility knife or scissors
Okay you are now ready to begin your project, As always make sure that you are physically able to withstand heat, cold and strenuous work and that you always have someone with you in case of an accident.
And always REMEMBER TO CALL: Before you DIG!, There may be buried water lines, gas lines, or electrical lines. Each town has a FREE locate service. Please use this service before you dig!
- Purchase all materials desired
- Begin by digging a narrow trench next to the walk way where you wish to install the bed
- The trench should be at least 6” deep x 6” wide x desired length
- Save the dirt removed to return to the bed later (If needed)
- Remove any excessive dirt so that the bed is at least 2” lower than walkway if next to it
- Lay the landscaping mat out so that it extends 18” larger than the bed itself
- The excess will be used to wrap the 2nd stacked timber
- Guide the mat into the trench you have dug
- Lay one timber in the trench around the bed
- Stack the next timber on top of the first one
- Drill at least 3 – 9/16” holes in an timber 10’ft long (Every 2’ or so) into both timbers stacked on each other (Your drill bit may not go all the way through both timbers, This is okay, After you drill through the top one it will mark the location on the bottom one.
- Lay the top board to the side (You will use it for a template for the 3rd board so that all holes will line up correctly
- Continue to drill out the whole on the 1st board in the trench
- Using the 2nd board, Lay it on top of the 3rd board and mark the holes by drilling through the 2nd one again, Remove the template board and continue to drill the 3rd board
- Now you are ready to install them
- Place the 2nd timber on top of the 1st one.
- Drive your ½” rebar into the two timbers in the trench (Make sure the holes are aligned) Leave about 4”-5” of the rebar sticking out of the timber
- Now pull the landscaping mat up and over the 2nd timber forcing the rebar through the mat
- Tuck the excess over the inside of the timber (You are wrapping the two timbers together)
- Now lay the 3rd timber on top of the second one
- Now fill the bed to desired depth with mulch or top soil
- Plant the desired plants with small hole in landscaping mat (Only large enough for plant stem, root or seed.
- Make sure that the rebar is flush with the top of the 3rd timber (For safety)
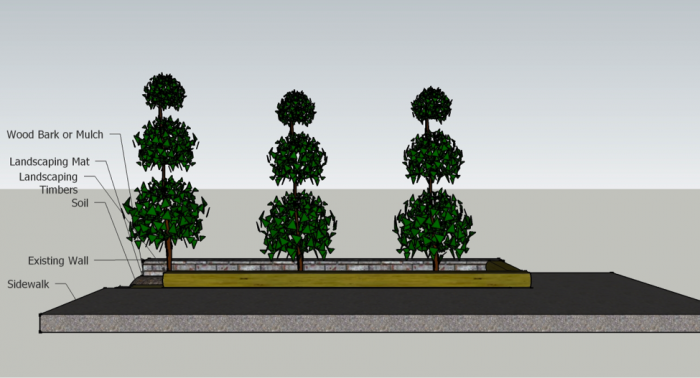
- I have attached a few drawings to show the important views
- Enjoy your weedless flower bed.
<>