Engineered flooring is an attractive compromise between solid wood flooring and plastic laminate flooring. Solid wood flooring has contributed great natural beauty to interior spaces for hundreds of years. That “natural” quality does have its drawbacks, however, as nature does not grow trees that adhere to manufacturing standards of consistency and uniformity. One solution is to use laminates, which place a photograph of wood atop a fiber core and coat the top layer with clear melamine resins. Engineered flooring is a type of laminate, but its layers are made entirely of wood. It has the look of a real wood floor and the ease of installation of a plastic laminate.
PREPARATION
Since engineered flooring is real wood, it needs to be acclimated to its new environment before installation. Boxes of flooring should be stored in the room where installation is planned and should be opened several days before installation begins. Add some extra acclimation time if the room has been recently plastered, since uncured plaster will add a great deal of moisture to the air.
Baseboard trim and obstructions like baseboard caps and floor register plates should be removed and door casings should be trimmed so that the new flooring can fit beneath the casing. Check the existing subfloor checked for squeaks, loose areas and spots that are out of level. Problem areas can be screwed down and the floor can be leveled by sanding high spots and filling low spots with leveling compound.
PLANNING
Once the room is ready, it is time to plan the layout of the flooring. The goal is to lay the flooring so it is completely square with the room, an objective that is more difficult to attain if the walls themselves are out of square. The best way to minimize this problem is to orient the new boards with reference to a long exterior wall. Laying the boards lengthwise in the room has the added benefit of imparting a more spacious feeling to the room.
If the planks are especially wide, it is worth planning the layout so that planks are balanced across the width of the room. This avoids the situation in which excessively narrow strips are left at either side. “Dry-fitting” the planks before adhering them to the subfloor provides a good first look at the layout without committing to anything irrevocable.
INSTALLATION
Now that the planning is done, the floor can be laid. Boards should be selected from multiple boxes as the work progresses so that minor color variations from box to box are distributed evenly, avoiding a blotchy look.
Individual planks should be laid so that their end joints are as far as possible from the end joints of the neighboring row. As a rule of thumb, 12 inches is the minimum.
Although engineered flooring is more resistant to environmental effects than natural wood, it is not immune. Humidity and temperature changes can cause the boards to expand and contract, leading to buckling if there is no room for them to move. For that reason, a one-half inch gap, called an “expansion joint,” should be left between the planks and the perimeter walls.
Engineered flooring is constructed with tongues that slip into grooves on the adjacent board both lengthwise and at each end. It is important to use a tapping block to move the boards into place, because the tongues are easily damaged and impossible to repair. Tongues at board ends should be left intact except where the boards meet a wall.
Different engineered floors call for different methods of installation. Sometimes the subfloor itself dictates the method: For example, boards cannot be nailed or stapled into concrete.
Three methods are used to attach the flooring. From least to most labor-intensive, they are:
- Floating, in which the boards are not affixed to the subfloor at all, is the easiest to install and the easiest to repair, since damaged boards can be lifted without destroying large expanses of the floor.
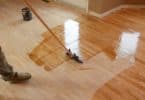
- Glue, using glues specifically designed for engineered flooring, requires meticulous preparation of the subfloor to avoid oil, dirt and moisture but can work on almost any subfloor.
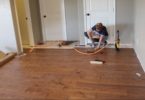
- Stapling or nailing, using tools and materials specifically intended for flooring, is the traditional method of affixing wood flooring, engineered or otherwise, and is the method that requires the most skill of the installer.
Detailed video demonstrations of floating and nailing can be found at This Old House: Wood Floors , and useful information about subfloor preparation for gluing is available at Woods The Best: Engineered Flooring Installation.