

Remove Bathroom Tiles
<>
When it comes to bathroom design, tiles have been a popular medium to use for everything from tub and shower surrounds to flooring and decorative elements. When it comes to repairing or remodeling a bathroom with existing tile, however, care must be taken to ensure that there is no residual damage to the underlying structures. The reason for this is so that whatever medium used to replace it can adhere to the wall or floor and be completely secure.
Before you begin your project, make sure that this is something within your scope of abilities. You would not want to get halfway into a project and then decide that it is simply just too much for you. Make a plan, gather your supplies, and set to work.
The first thing to remember when completing a project like this is “safety first.” Always make sure you have a pair of safety goggles on when doing any kind of work where small particles are moving about. You may also want a pair of good work gloves for this task and a dust mask.
Contents
Other items you will or may need are:
• Masking tape
• Canvas drop cloths
• Flat head screwdriver
• Putty knife
• Utility knife
• Grout removal tool
• Rubber mallet or hammer
• Wrenches (for removing pipes if necessary)
• Power drill and carbide tip drill bits
Start Preparing the Work Area
If you are removing tile around a tub, place canvas drop cloths over the tub surface so that falling tile will not damage it. Use medium sized buckets to transport tile as it is removed so that it does not pile up.
Remove Fixtures If Necessary
For areas surrounding a sink or toilet, be sure to shut the water off by turning the supply valves to the “off” position. In more severe cases, sinks and toilets may need to be removed. If this is the case, make sure that all plumbing is removed and/or covered before work begins. Also, cover up any areas that falling tile may hit such as floors or other fixtures in the area.
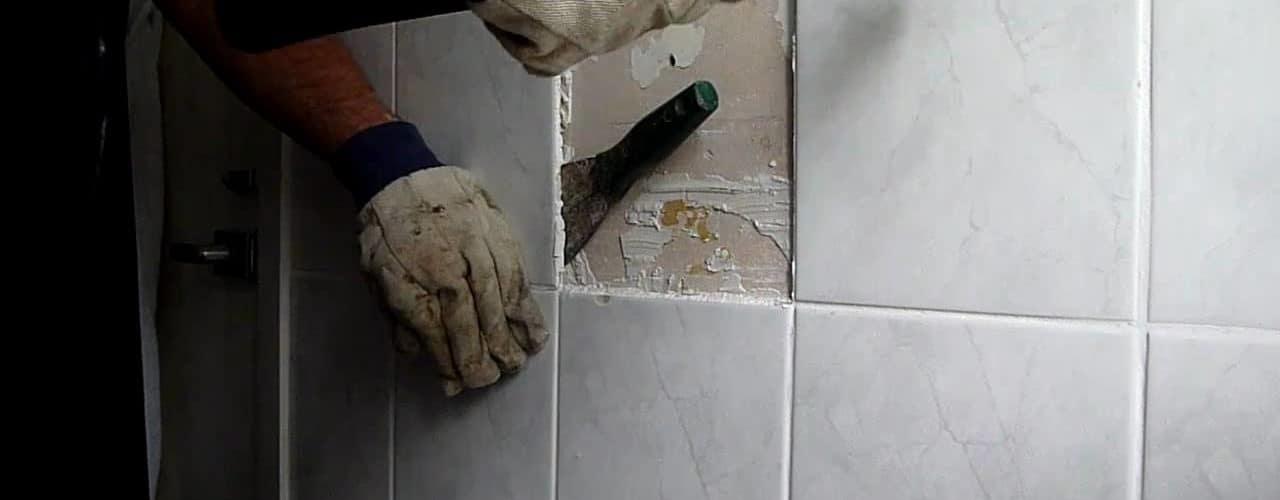
Remove Grout
Removing the first tile can often be the hardest portion of this type of job. Use the grout removal tool or utility knife and scrape out the grout around the tile you wish to remove.
Remove First Tile
Try prying the tile off with the putty knife by pushing the knife blade between the tile and the wall or floor surface at an angle so as not to cut into the surface, but go between it and the tile. Gently lift up on the handle to see if the tile will loosen and disconnect. If the tile resists a great deal, this is the time to use the masking tape to place and “x” on the tile from corner to corner. Then, using the power drill, begin drilling small holes on top of the masking tape, which will keep the bit from slipping on the tile. Once you have made several holes, use the putty knife or flat head screwdriver to pry away smaller pieces of the tile until the tile is completely removed. This should allow you to more easily remove the rest of the tiles with the putty knife, but if they are stubborn, try wedging the knife between the tile and backing by lightly tapping with the mallet.
When it comes to home improvement projects, always read up on the job you are delving into. The internet can be a great place to find information. Try these two sites for more information: DIY, eHow
Related Posts
- How To Tile a Bathroom Floor?
- How To Clean Tile?
- How To Lay Bathroom Tiles?
- How To Tile Bathroom Walls?

