Laminate provides a beautiful, durable flooring surface and can be laid by the average homeowner. However, it is not as easy as the advertisements say! Following these steps will get your laminate floor down and looking great in no time.
1. Clear the old floor of any carpet, padding, staples, and quarter-round trim. Clear the floor all the way to the subfloor; however, it is okay to leave linoleum. Remove quarter-round but leave baseboard in place (unless you also want to replace that).
2. Place your laminate flooring in the room for several days prior to installation. This helps the laminate expand or contract to the room’s usual temperature, and may prevent expansion problems later.
3. Measure carefully. Decide which direction your laminate will face and then measure across the room (you are measuring the width of the room). Now measure the width–not the length–of your laminate. Divide the width of the room by this figure. How many pieces will you need? If your figure shows you will need a whole number of pieces, cut the first board in half lengthwise and begin with a half piece. The reason for this is that you do not want to end up with a fraction of a piece on the other end–perhaps 1 inch wide. You want your last piece to be at least half the width of the laminate, as this will make it easier to fit into place. Do your calculations carefully and refigure to make sure you are right–you do not want to find out when the whole floor is almost in that you have made a mistake!
4. Deal with doorways. If you have existing doorframes, you will have to cut the frames so the laminate will fit under the casing. Check for fit by sliding a piece of laminate under the doorframe and making adjustments as necessary. Be sure to use a piece of the foam underlayment under the laminate when you check for height.
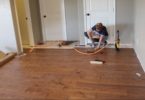
4. Lay the foam underlayment if necessary. Now lay your first row of laminate, leaving a 1/4-inch gap between the baseboard and the laminate. In order to maintain this gap, slide some spacers between the wall and the laminate–scrap pieces of laminate standing on end work very well. When you get to the end of the row, cut the piece for length and leave a 1/4-inch gap at the end along with a spacer. Take the piece you have cut, carry it back to the beginning of your row, flip it around, and it becomes your beginning piece for the next row! You can continue to do this as long as your rows do not fall evenly. Try not to have seams match each other across the width of your floor.
5. Getting the pieces together. While the videos make it look easy, the “snap-together” pieces can be tricky. In order to properly seat them, you will probably need a couple of tools. First, you need a cast-off piece of laminate; you also need a crowbar bent at both ends in opposite directions. Seat the scrap laminate against the board you want to push into place, locking the “clicking” mechanism into place. Place the crowbar against the scrap laminate and tap the other end with your hammer. This transfers the force to the crowbar, not your laminate piece, preventing damage (and once you chip a piece, you have to use it for scrap or fit it in at the end of a row). Continue this process until the end.
Below are some links and a video of this process:
DIY Network: Install Laminate Flooring
Extreme How To: Installing Laminates
Here is a video on installing laminate flooring.
<>
<>