Over time, hardwood floors can lose their good looks as the finish gets worn. Fortunately, refinishing hardwood floors is something that can be done as a do-it-yourself project. By refinishing the floor yourself, you can bring back its original shine and make it look like new without having to spend a lot of money for a refinishing service.
To refinish a hardwood floor, you will first need to prepare the surface. Of course, all furniture, rugs, and other removable items first need to be removed. Then the floor will need to be checked for hazards like nails, carpet staples, and anything else that would harm sanding equipment. If nails are sticking up, hammer them down beneath the surface. If there are carpet staples, these will need to be pulled out. Pull out or hammer down any other such unsandable protrusions you find.
Now it’s time to sand the floor. Since you’ll only be using the sander for the one job, it’s best to rent one. Using a big drum sander is often recommended, but these can be hard to work with. If a drum sander is left in one place too long, it can easily put a permanent gouge into the floor. A newer type of floor sander is called an orbital sander. These are easier to control, but still not foolproof. When you’re at the rental shop, ask for a demonstration of proper usage technique. Also, when you’re sanding your floor, start in a place you know will be hidden by a piece of furniture when you’re done. That way, any errors you may make as you get used to the machine will be hidden.
 Sanding a hardwood floor takes several passes. Each pass should be done so you’re sanding with the grain of the wood. Also, use a finer grit each time you go over the floor. Starting with a heavy grit, like 36, is a good idea. Once you’ve done the whole floor with the 36-grit, move up to 60-grit. Continue through 80-grit and end with 100-grit. If there are pre-existing scratches or lines that need to be removed from the floor, go over them a few extra times with 60-grit or finer sandpaper. Remember to use the 100-grit on the whole floor when you’re done.
Between each sanding run, use a shop vac to pick up the sanding dust. This will keep the new pieces of sandpaper from getting clogged with the dust from the previous run.
If the sander you rented doesn’t reach the edges of the room, you will need to rent an edge sander to go with it. Use the same sequence of heavy-to-fine sandpapers with this machine.
Once you’ve finished all of the sanding, sweep the floor and then vacuum it. You may need to go over it with a tack rag to get all of the sanding dust up. It is important to get as much dust up as possible at this point, because the next step is applying the new finish to the hardwood floor. The cleaner you can get the floor, the better the final result will look.
If you want to add color to the floor, staining it is the next step. If you want it natural, skip the stain and proceed to the final finishing step. Before applying stain or finish, open the windows and doors so the room is properly ventilated.
To get a dark color, apply the stain with a brush and use a rag to smooth it out. If you want a light coat of stain, just use a rag to apply it. Before starting on the visible areas, test-stain a small area in a closet or an area you know will end up covered with furniture. Wait five minutes for it to show its true color. If you’re satisfied, continue on and stain the rest of the floor.
After the first coat dries, you may decide it needs a second coat. In that case, simply apply it. Wait for the floor to dry completely before proceeding.
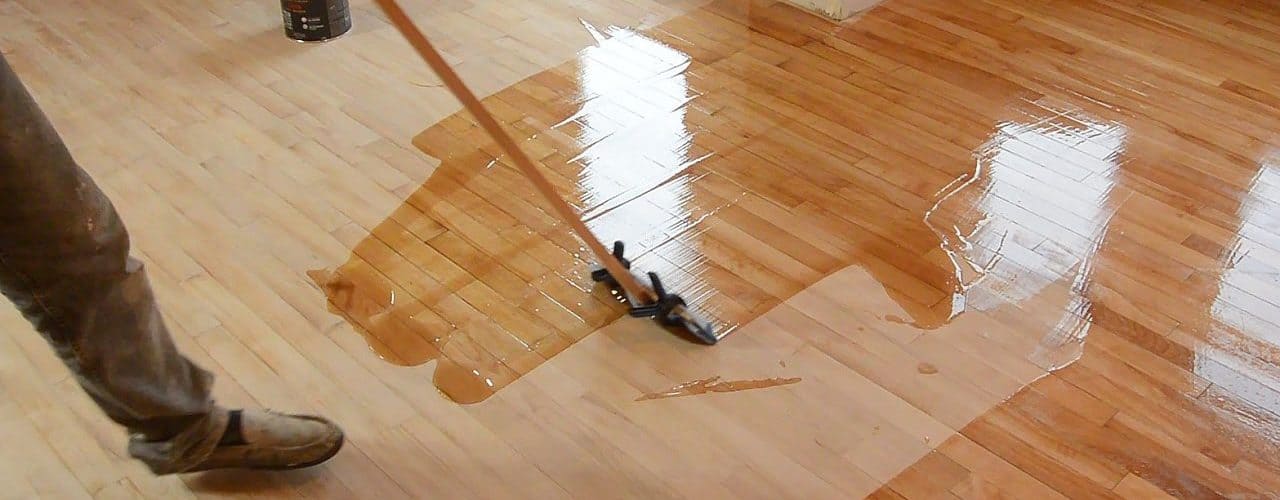
Now it’s time for the actual “finishing” part of refinishing your hardwood floor. For this, you will need polyurethane finish. This is what gives the floor its shine as well as what gives it some protection from damage. It is possible to get polyurethane finish in both glossy and semi-matte formulations. Choose the one that suits your taste the best.
Stir the can of polyurethane floor finish. Avoid shaking the can because shaking will cause air bubbles that would cause a poor final result.
Using smooth, even strokes, apply the polyurethane in the direction of the grain of the wood. Going with the grain makes it much easier to avoid having marks in the finish. Use a brush or roller for the application.
Wait for the first coat of polyurethane finish to be dry to the touch. The time varies by brand, but the average is about three hours. Once the first coat is dry, apply a second.
Let the second coat dry completely before moving furniture or rugs back onto the floor. Depending on the brand of polyurethane, the current weather conditions, and other such variables, this can take up to three days. In any case, you should wait at least overnight even if the floor seems dry sooner.
Once the furniture and rugs are back in the room, you’re done. You can now sit in your room and admire the results of refinishing your hardwood floor and enjoy the pride of a job well done.