Contents
- 1 Step 1. Planning for your lean to shed
- 2 Step 2. The right size lean to shed
- 3 Step 3. Sketching your lean to shed plans
- 4 Step 4. Know the regulations and get the right permits
- 5 Step 5. Lay out the area for your lean to shed
- 6 Step 6. Building the frame of your lean to shed
- 7 Step 7. Door placement for the shed
- 8 Step 8. Covering the lean to shed
- 9 Step 9. Constructing the roof
- 10 Step 10. Finishing the shed
- 11 Related Video:
Step 1. Planning for your lean to shed
Once you have decided that you have a need for a lean to shed on your property and you want to build this yourself, you will need to do some planning and make the proper preparations to get desired results. Lean to sheds can be constructed as an addition to a building that is already in use such as a wooden storage shed, garage or live stock barn, or you can construct lean to sheds to stand alone. People use lean to sheds for storing firewood, hitching and feeding areas for barn animals, storage for grills and outdoor equipment and even as work stations for gardening. Before making preparations for your lean to you will need to know if it will be attached to another building or as a stand alone style shed.
Step 2. The right size lean to shed
You will need to determine what size lean to shed you will need to build in order to give you the benefits for the purposes you have intended. You will also need to make sure that you have the right amount of space for the size lean to shed you want to build. Using a measuring tape you can measure the area you have decided to install your lean to shed on. You will need to do the math that is required to determine the height and width dimensions that will work best for your desired outcome. If you plan on using the lean to shed for storage of large items such as tractors or lawn mowing equipment you will need to work backward starting with the size that will allow for the storage of these items.
Step 3. Sketching your lean to shed plans
Draw out your intended lean to shed designs including the calculations and measurements you have selected. This will help to determine the amount of lumber and other supplies you will need to get to complete your project. If your lean to shed is going to be an addition to another building you will need to figure in the designs for a three wall shed. If your lean to shed is going to be a free standing building you will need to figure in the designs for a four wall shed. Remember that one side of your lean to shed will be taller than the other. This features helps to keep rain from building on the roof of your shed and allows coverage from weather conditions when storing your items. You will also need to calculate the amount of lumber and supplies necessary for your roof, any doors, shelves and space dividers that you may want to incorporate into your design. As a tip, it is advisable to have someone who is good with math to look over your designs before beginning your lean to shed project. This can help find even simple errors that can get over looked when you are the one designing the shed. Customer service associates at your local home improvement store or lumber yard are usually the best people who can help you with this type of issue.
Step 4. Know the regulations and get the right permits
Different zoning areas have different regulations on the laws surrounding the construction and remodeling of buildings on your property as well as projects completed in your home. You can contact your local ordinance office to find out if there are any specials laws or regulations in your area and if there are any type of building or inspection permits that you may need in order to build your lean to shed.
Step 5. Lay out the area for your lean to shed
Using wooden 12 inch stakes outline the area that you will be using for your lean to shed. Wrap string tightly around the top of your wooden stakes to keep people out of your work area. If your lean to shed is a freestanding style shed you and there is no concrete slab base you will need to use concrete blocks as your shed base. The floor will need to be constructed with 2” x 4” pieces of lumber that are cut to your desired length for the shed. Use 16d galvanized nails to hold the pieces of lumber in place. Cover the top of your 2” x 4” pieces of wood with ¾” thick plywood.
Step 6. Building the frame of your lean to shed
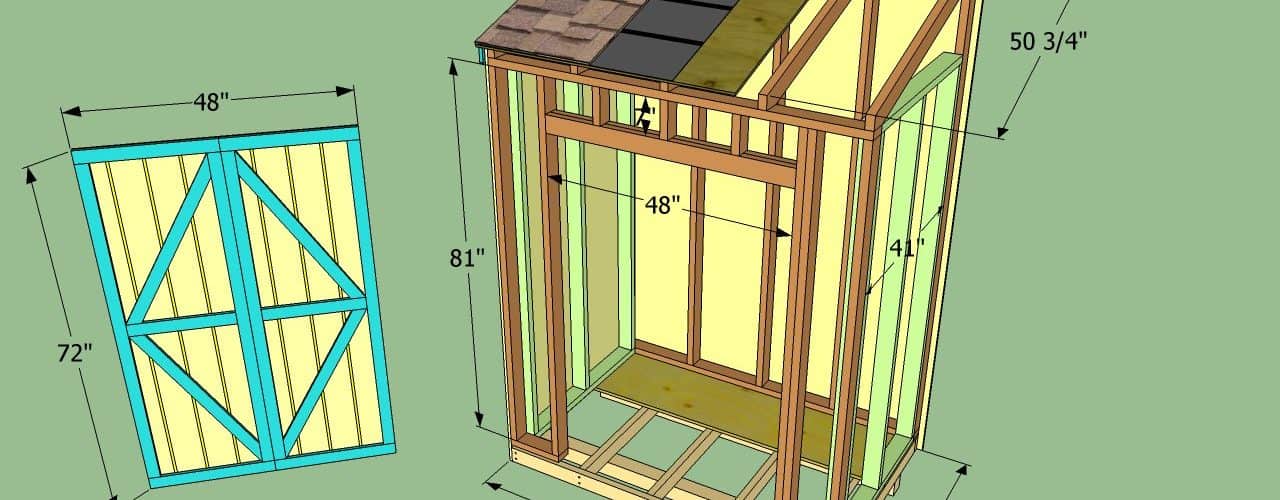
Use the sketched plans that you designed for your lean to shed to frame the walls necessary for your shed. Add metal braces at each of the corners of the shed to reinforce the wall framing. You can either attach the wall framing directly to the exterior of your home or other building if it is an attached style lean to shed. You can frame the sides and front of your lean to shed on the ground and then lift them into place if you are constructing a free standing shed. This style shed will need to have the wall frames anchored to the base. Secure the wall frames to the floor you build for the shed.
Step 7. Door placement for the shed
When looking at your lean to shed frame determine where you want the door to the shed to be installed. You will need to use your 2” x 4” pieces of lumber cut to size to build a door frame. You can opt to use a ready made door that is complete with hinges and hardware if you want a quicker method for your shed.
Step 8. Covering the lean to shed
Use 2” x 4” planks of lumber to cover the entire lean to shed area. You can nail these in any vertical or horizontal pattern that you choose. Nail these in place with galvanized construction grade nails. You can hang a plumb line to help guarantee that all of your corners are perfectly square.
Step 9. Constructing the roof
Again you will need to use 2” x 4” pieces of lumber that is cut to the proper size to build your shed roof rafters. If you choose to have a flat style roof you can mount 2” x 4” pieces of lumber across the top of the wall frames and cover the entire area of the roof with ¾” thick plywood. If you want a pitched style roof you can create this by joining boards together to create L-shaped rafters. You will then bolt your rafters to the wall frames prior to installing the plywood necessary to cover this. Cover your roof with shingles that you nail in place to keep the interior of the lean to shed dry.
Step 10. Finishing the shed
You can finish your lean to shed by sanding the entire surface with a medium grit sanding paper to remove any rough edges. Use a primer and paint that is intended for wooden exterior surfaces. You can also opt for a stain type of paint in your intended colors to match your home.
Related Video:
Building a Lean-to Shed
<>
<>

