
If you have a loft space in your cabin or residence, you will need an access ladder. A wooden loft ladder can be purchased, custom ordered, or easily built from a few simple supplies. The important features to look for in a loft ladder are its strength, its convenience, and its ability to be tucked out of the way.
Contents
Evaluate Your Space
What type of loft do you have? An attic storage area with a trap door? An open area under a high ceiling? Perhaps your loft is a sleeping or living area. The kind of loft you have will help you to determine the best type of access ladder, and whether to purchase or build one.
Buy or Build?
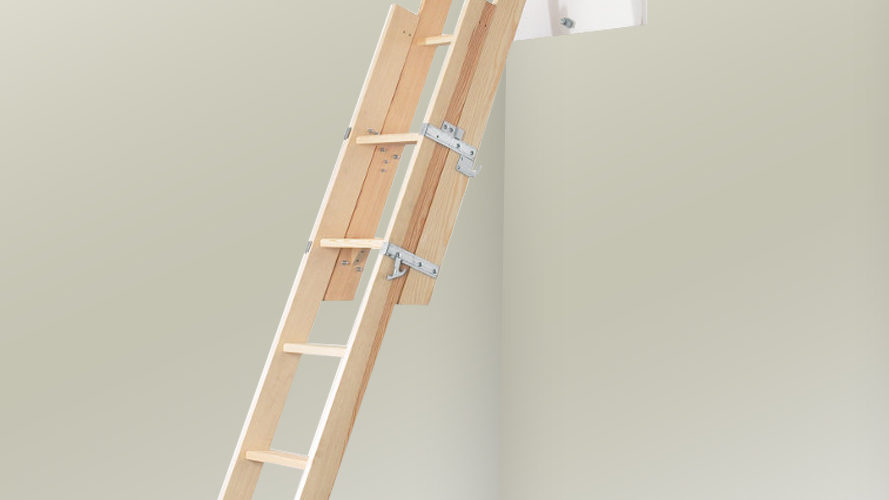
Let’s start with the attic loft. For this application, you will probably need a concertina or sliding extension ladder/hatch unit, because often an attic space can only be accessed through a small opening in the ceiling of the room below.
While these sorts of loft ladders are available in both aluminum and wood, due to the aesthetic value and quieter operation of wooden loft ladders, this is the better choice in most cases. A concertina loft ladder folds up like an accordion and is stored on the hatch door. A sliding loft ladder slides open and shut in short, telescoping sections and also stores on the hatch when not in use. Both these types of ladders are sufficiently complex to disqualify them as a do-it-yourself project. Be prepared to pay a premium, however, for your concertina or sliding loft ladder–between $300 and $500.
 For your living-space loft, the choices of timber access ladders are more varied. You may get lucky and find a ladder of the right height at a home improvement store, but in order to get a ladder with the exact fit, you will likely need to have one custom-made or build it yourself.
To measure for your wood loft ladder, take the floor to loft measurement and add 10-12 inches to ensure a hand-hold for the up-and-over step. The ladder can be a standard width–12″–or wide enough to fill the span of the loft access space. If you are short on time or carpentry experience, take these measurements to your carpenter for construction of the ladder. Depending on the grade and species of wood you agree upon, plus the complexity of your building plan, expect to pay a minimum of a few hundred dollars for the completed product. When you consider that your loft ladder will be a permanent furnishing, the cost is reasonable and comparative to what you have probably spent for other home furnishings. When you look at your professionally custom-made timber ladder on a daily basis, you will undoubtedly consider the money well spent.
However, if you would like to save money and have the satisfaction of building a wood loft access ladder yourself, there are many plans and ideas on the internet and in home building books to get you started.
Below are basic instructions for constructing a log-style loft ladder. Wood, hardware, and stain will add up to less than $100.
You will need:
- Tape measure
- Carpenter’s pencil
- Carpenter’s square
- Circular saw
- Drill and 1/4″ bit
- 3/8″ thick, 4″ long lag bolts
- 3/8″ socket wrench
- Several 3″-5″ diameter peeled pine or fir logs
- Sand paper
- Stain or urethane
Step One:
Measure your loft height from floor to floor; add 12″. Mark two of the thickest logs with this measurement and, using your carpenter’s square, draw a sawing line across each log. Using your circular saw, cut on line. These are the side pieces for your log loft ladder.
Step Two:
Determine the desired width of your ladder. Subtract the widths (diameters) of your side pieces in step one. This will be the measurement of your ladder rung pieces. To calculate how many rung sections you will need, divide the length of your side pieces by 10″(the standard distance between rungs). Round off this number to the nearest whole number, and subtract one. Measure, mark, and cut your rung pieces from your smallest-diameter logs, as described in step one.
Step Three:
Lay the side ladder logs across your sawhorses. Mark placement lines for the rungs every ten inches, eliminating the topmost rung since this would interfere with stepping into the loft space. Be sure that the placement marks on both side pieces line up exactly. Using a 1/4″ bit, carefully drill through the side pieces at each mark, centering the bit on the log and taking care to drill straight through; most drills have a built-in level to help you do this.
Step Four:
Lay one side piece on a flat surface. On the outside of the side piece, start three 4″ long lag bolts in the pre-drilled holes , using a 3/8″ socket wrench assembly. Hold a log ladder rung tightly against the inside of the side piece, centering over the drilled hole; ratchet the lag bolt completely through the side piece and into the center point of the cut end of your log rung. Repeat for two more rungs before securing the other side log piece in the same manner to the opposite ends of the rungs. Now that your ladder is started, you will find it easier to attach your remaining rungs.
Step Five:
With all rungs in place, test the stability of your wood loft ladder. If it wobbles, go back over each lag bolt and tighten it more securely.
Step Six:
Sand the entire ladder using a fine grain sand paper, paying special attention to the ends of the rungs where they meet the side logs, as well as to the ends of the side pieces. When the ladder is smooth to the touch, apply stain and/or urethane to complete your beautiful, hand crafted folding wooden loft ladder.
Whether purchased, custom-built or hand-made, your quality wooden loft ladder should provide many years of access to your loft space. Refinish the wood and tighten the hardware as needed, and enjoy!
<>

