
A storage shed is one of the most useful additions a homeowner can purchase or build. Many homeowners choose to buy pre-built storage sheds, convinced by manufacturers that it is difficult or impossible or impractical to build their own. However, not only is it possible to build your own shed, it can be done for far less trouble and money than you think! Building your own shed will give you hours of joy and years of use, save money, and satisfy your creative urges. What are you waiting for?
Once you’ve decided to build a shed rather than buy a completed one, you have two options: one is to build a shed using a widely available shed kit; the other is to build one from scratch. Let’s explore the first option, then the second. If you choose a shed kit, it will typically include everything you need for the shed, including windows, doors, siding boards, and all the necessary frames and relevant fixtures. Shed kits will also come in one of the typical shed-building materials, which include metal, poly vinyl carbonate, and wood. If you build your shed from a kit, you will obtain the satisfaction that comes from doing the job yourself, as well as some creative liberty for experimentation.
However, if you have enough enthusiasm and energy, you can build your shed from absolutely nothing. If you start from scratch, you only need a basic feeling of geometry, as well as some basic carpentry skills (how to hammer, how to saw, and so on). You will need tools like screwdrivers, drills, levels, hammers, and saws. You will likely benefit from a drill for tasks like cutting wood, adding shingles to the roof, and putting up windows and doors. However, patience and time are the most necessary tools for building a shed.
Regardless of which type of shed you choose to build (kit or scratch), once you have the necessary construction materials and tools, the first step to building your shed will be to mark the site you intend to build it on. Make sure that your square or rectangle has even dimensions and angles in the ground. You can do this by measuring diagonals from one end to another; they should be equal in length. For your shed foundation, you won’t necessarily need more than a layer of concrete. However, if the ground will freeze in winter (i.e., if you live in a more northern climate), then use a thinner concrete foundation. Additionally, attach the shed to the ground in some manner, so it is not knocked down by strong winds.
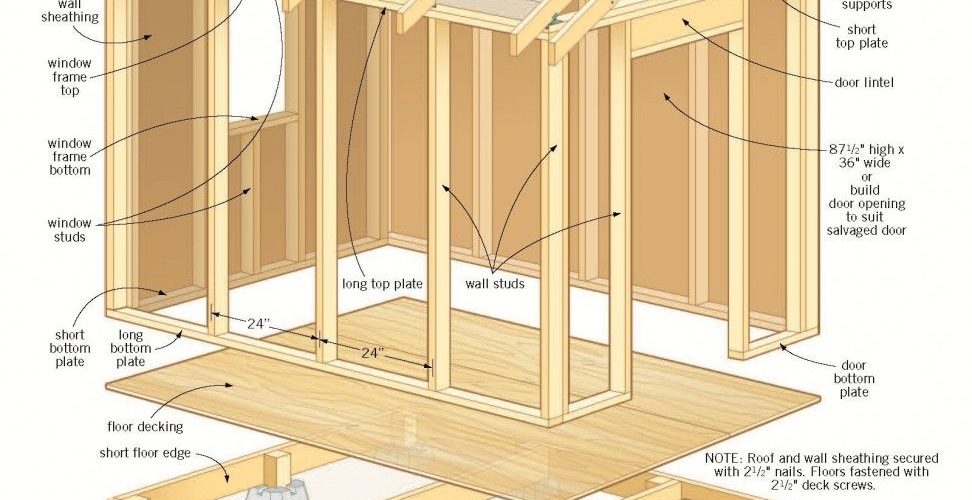
Next, you must raise the framework of the shed. Check the framework carefully to ensure it is horizontal where it needs to be and vertical relative to the ground. You can buy premade frames and attach them with screws, or you can build your own. Once you have installed the framework, then you will place siding boards. The most challenging part of building a shed will be the erection of a frame that is perpendicular in alignment. Take your time here. Then affix your doors and windows with screws and hinges. Attach the roof and test it for stability. Remember that sloping and flat roofs attach more easily than shingled roofs.
Once completed, you can paint your shed to customize it further, and decorate it in various ways. Consider trellises and creepers for distinction. Good luck and go build!

