
The installation of a wood floor begins with the right choice of materials. This is not a mere matter of purchasing quality wood that has a pleasing appearance. The buyer must also consider unique conditions relating to water hazards, subfloor conditions, and any possible needs for special sound deadening applications.
When subjected to continuous moisture conditions, some wood flooring products will tend to discolor more quickly than others. As a rule of thumb, a wood floor should not be installed beneath the level of ground surface grade, or in a bathroom type environment. As to methods of installation, the application procedures necessary to achieve a dependable end-product will vary in accordance to the type of existing subfloor construction, and the choice of finished wood material. For example: when dealing with a concrete subfloor, an engineered wood flooring product is most always best. Audio management and the need for additional sound deadening materials is determined by where the room is located and by how the room is used.
For general household installation, a standard vapor retarder along with the vendor recommended resilient pads will sufficiently serve the purpose of controlling creaks, squeaks, and harsh echoes. For a detailed description of wood floor types, styles, cuts, grades, and recommendations concerning areas of usage check out www.woodfloorsonline.com.
Fundamentals of Wood Floor Installation
Installation of various types of wood flooring materials will differ in relation to the associated materials and structure of the subfloor. Yet all applications of solid wood flooring will include several common procedures. The following fundamentals of wood floor installation are based upon using a 25/32 inch by 2-1/4” inch minimum, solid wood flooring material:
1. Study the flooring manufacturer’s installation procedures, requirements, and method of warranty verification.
2. Unless adequate space can be allotted for long term, onsite material storage and environmental acclimation do not have the material delivered until the arrival can coincide with an appropriate installation schedule.
3. When the wood flooring material arrives, establish environmental conditions that are in compliance with the manufacturer’s requirements. Promote uniform acclimation by unpacking the wood materials into a loosely arranged pile. Let it set for the manufacturer’s recommended time span.
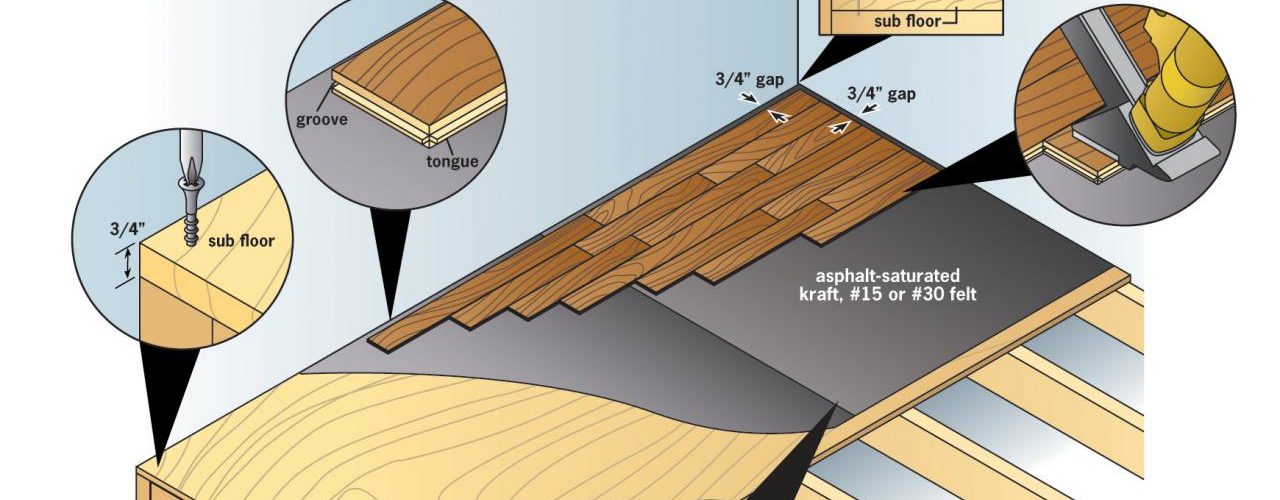
4. Use a PVC tape of a spray adhesive to install, as necessary, a carbonized polyethylene vapor retarder, or felt paper. Overlap the joints by six inches and completely seal.
5. Install resilient pads. These will be a PVC product with either air slots or cells. Be sure to confirm that they are sized according to the manufacturer’s specifications.
6. When required due to a concrete subfloor, install four-ply minimum, ½ inch CDX, APA graded and stamped plywood.
7. Following the manufacturer’s recommendations, load your power-driver with two inch long barbed cleats or with coated staples.
8. Measure and cut the finish wood so that it can be installed parallel to the long dimension. End joints should be fitted to the dimensions as recommended by the manufacturer. Remember, this is a critical matter of humidity requirements.
9. Drive the side joints in a method that reflects the manufacturer’s suggestions. The manner in which the wood responds to humidity will change according to the type of wood material in use.
10. Use the power-driver to nail or staple the finish wood into place. Work along the length of the wood in both directions from the middle outward.
11. If necessary, sand and finish the wood.
12. Install baseboards and shoe molding. For a detailed, text/video instruction guide to baseboard and shoe molding installation, see the following eHow article.
This completes the preplanning stage, the fundamental mode of application, and the order of the steps. For a complete and accurate video of how to install a solid hardwood floor, see the following YouTube video below:
https://youtube.com/watch?v=-0higv3C-Ns

