For homes with limited garage space, a shed is an elegant solution for the storage of yard maintenance equipment. The easiest way to build a shed is to simply purchase a prefabricated one at the store. However, these can be much more expensive than actually designing and building a customized shed. Furthermore, the customized shed will suit very specific needs designed for a particular workbench, a certain set of lawn tools, or a space to work on a project car.
The first thing to be considered for a shed is to decide the floor material. This will determine whether the shed will be built on a slab or on the bare ground. Dirt-floored sheds have the benefit of having an undamageable floor of dirt – any spilled oil or dropped tools will not stain or chip a concrete floor. However, a concrete floor is cleaner and will keep dust to a minimum. Concrete floors can also be epoxied and are low-friction surfaces over which hydraulic jacks and yard equipment can be rolled with ease. Some sheds can even be built on “skids” which allow it to easily be moved from one location to another. These sheds typically have a wooden floor, limited weight capacity, and need to be staked down to prevent wind from blowing them away.
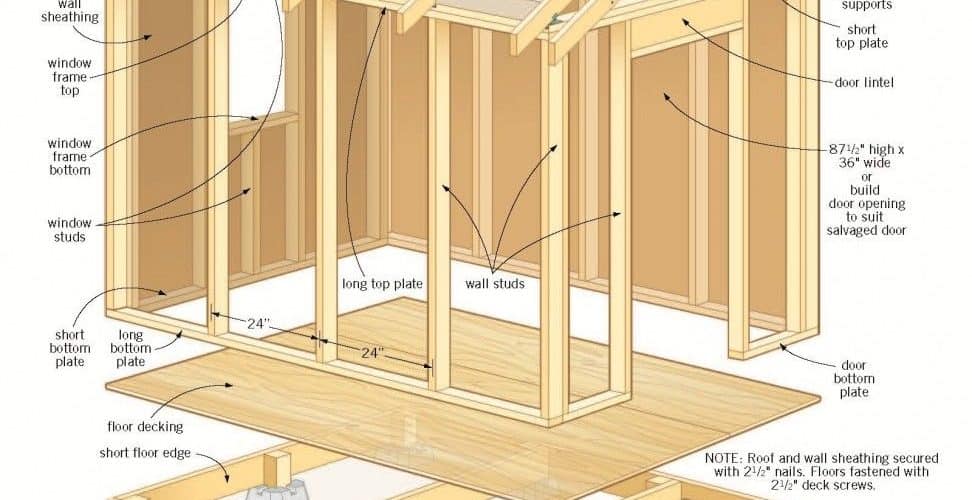
The first step is to design the shed itself. This is where it will be decided how the shed will be put together. Considerations such as roof pitch, area, foundation size, shape, and accommodation of contents should all be thought over. Once this has been decided, the wood layout is performed. A materials list is generated and each stick or sheet of lumber is accounted for. A typical garden shed will be framed in 2×4 pine timber and sheathed in various types of plywood depending on the application. On the sides of the shed, it is common to use aluminum siding or other cladding on top of the plywood to ensure its longevity. The roof is also sheathed in plywood, followed by tar paper and then shingles.
The second and most important step to building a shed is to make a solid foundation. This can range from leveling and removing grass from a patch of lawn all the way to pouring footings and a slab. Whichever, it is important to make sure the shed is as level as possible as so not to put the frame under undue stress. Remember that a shed is only as good as its foundation.
The third step is the assembly of the shed. All of the wood should be laid out, measured, cut, dry-fitted, and then fastened together to form man-portable sections of the shed. These sections are then carried to the foundation where they are firmly affixed to it and one another as the shed takes shape. Sometimes a piece of the shed cannot be assembled and moved; in this case, it must be built in place.
After the shed has been framed, it is time for the cladding to go on the outside. The roof should be covered with felt or tar paper before shingles are applied. The outside of the shed may require a vapor barrier before cladding can be affixed.
After the cladding has been completed, the interior finishing can be done. This includes electrical systems, lighting, built-in shelving units, paint, epoxy flooring, heating, and other features as the original design calls for. Once all these amenities are in place, the shed is ready to be used and enjoyed.
Related Youtube Videos:
How to Build a Shed Yourself, Fast and Easy
<>
References:
Popular Mechanics: Build Your Own Garden Shed From PM Plans
Ask The Builder: How To Build A Shed