
Well chlorination, sometimes referred to as shock disinfection, may become necessary if a well has been tested and found to contain bacteria. A new well, or one that has recently undergone any repairs or maintenance, should be considered contaminated. Shock chlorination will kill any bacteria found in drinking water. However, if your well has a recurring bacteria issue, you will need to install some sort of permanent treatment option, such as an ultraviolet light unit or a chlorine injection system.
What Do You Need to Chlorinate a Well?
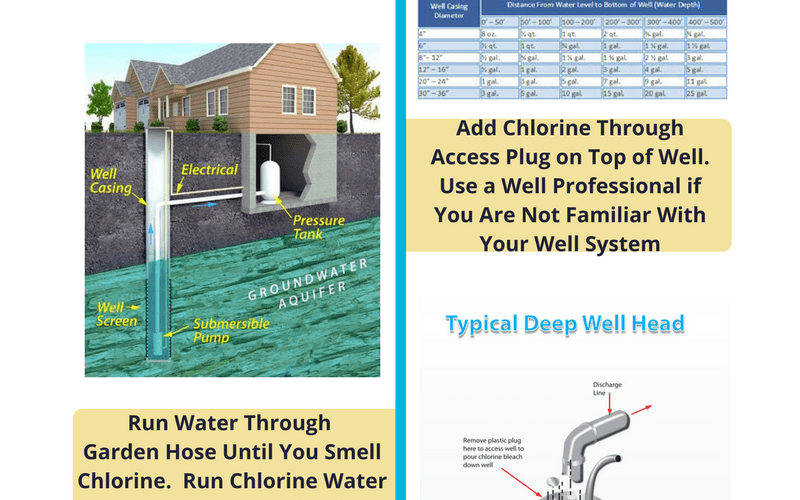
To perform a shock treatment on your well, common household bleach is all you need. Make sure to buy plain chlorine bleach, not bleach that has been scented in any way. Hypochlorite granules are also acceptable for use in shock disinfectant. The treatment requires varying amounts of bleach, depending on the well’s depth, but one gallon of bleach, or 12 ounces of granules, is the most you will need for this procedure. To determine the amount of disinfectant needed, you need to know how deep your well is. Please note that the depths listed below are for actual water depth, so if your well is 500 feet deep, but only 400 feet of water, then follow the guidelines for 400 feet. You can find this information through the Water Systems Council website or by contacting your well driller.
• 100 feet deep: 3 cups of bleach/2 ounces of granules
• 200 feet deep: 6 cups of bleach/4 ounces of granules
• 300 feet deep: 9 cups of bleach/6 ounces of granules
• 400 feet deep: 12 cups (3 quarts) of bleach/9 ounces of granules
• 500 feet deep: 1 gallon of bleach/12 ounces of granules
How to Chlorinate a Well
Before chlorinating your well, you will need enough drinking water for your household for at least 12, and preferably 24, hours, as the water from your well will not be safe to drink for that long after chlorination. In addition, if you have any water softeners, filters, or purifiers, disconnect these to ensure they are not harmed by the chlorine.
1. Remove the well cap and pour your chlorine solution into the well. You may wish to use a funnel, just be sure you’ve disinfected the funnel first. If you are unable to remove the well cap, or if there is none, you may need professional help in chlorinating your well. Contact your well service company or your well driller for assistance. If your well has a large diameter, splash the chlorine down the wall of the well to ensure all surfaces are brought into contact with the disinfectant.
2. Using a garden hose, spray water onto the well wall to wash the chlorine down into the well. Run the hose for about 30 minutes and thoroughly wash the walls of the well. Replace the well cap after turning off the hose.
3. One at a time, turn on all outdoor faucets until you can smell chlorine coming from each one, then turn off faucet. Repeat this procedure on the faucets inside the house. Finally, flush the toilets.
4. Do not use your well water for drinking, laundry, or cooking for at least 12 hours, though 24 hours is preferable.
5. After 12-24 hours, run each faucet until chlorine smell is gone and water runs clear. You must run the outside faucets first to prevent heavily chlorinated water from entering your septic tank or drainfield.
6. Allow at least two weeks before retesting your well water. Testing too soon will compromise the test results.

