Proper ventilation in your home is very important, and it is also important that other areas on the exterior of your house should also have proper ventilation.
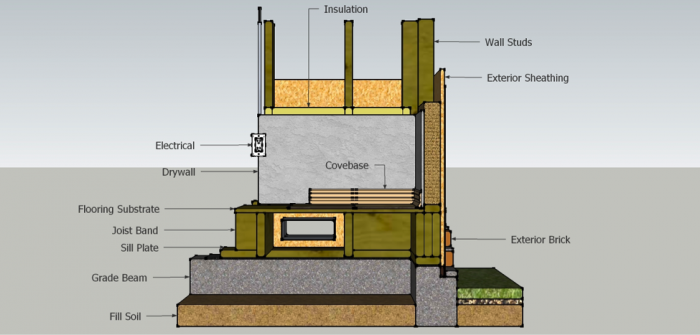
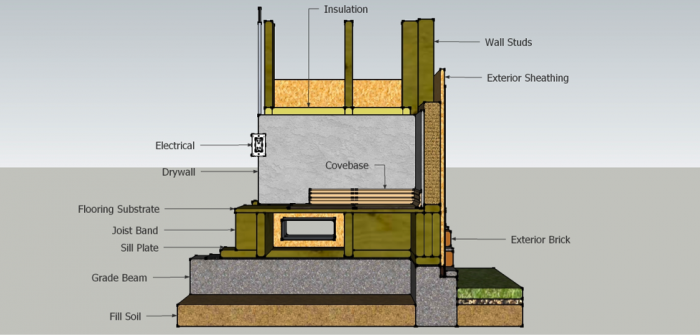
Most houses that are built on “Pier & Beam” foundations have or should have a crawl space beneath the house. This area may have access to plumbing and sometimes electrical which is routed under the floor and above the ground. See the image below:

Step 1
The small gap between the fill soil and the sill plate are commonly known as “Crawl Space” this small space can range in height from a few inches to several feet depending on the design of the home. In a lot of cases the house could have been built with little to no ventilation. In some cases this may be due to the building codes or extreme weather. (Check with your local building code department regarding their codes prior to modifying your home)
The benefits of having proper ventilation is moisture and temperature control. Moisture on wood and other materials can cause rot and rust which are the 2 R’s that you don’t want present in your home. To simplify this imagine:
It is 102 degrees outside and your house is 72 degrees inside. The walls, floor, ceilings and roof that divide these two temperatures are designed to block the temperature exchange or at least minimize it for a more comfortable climate.
Within these walls, floors and ceilings are other materials such as copper pipes etc. Now if we had water to these pipes we have another temperature to combine in the mix. Suppose the water temp is 65 degrees. There may be areas where the pipe is exposed to direct high temperatures (Such as the attic) if this piping is not insulated it will “Sweat” and allow beads of moisture to form on the outside of the copper pipe.
If this moisture is in large enough quantity it may appear as a roof leak as it will stain drywall ceilings or walls. Most of this can be corrected by insulating the pipe itself with pipe insulation and approved tape. This will provide a “Neutral air gap which again divides the cool temperatures from the high temperatures eliminating the moisture.
In this article I will mostly discuss “Below floor or foundation venting” in future articles I will go over attic ventilation since there is a large difference between the two.
See the picture below:

Step 2
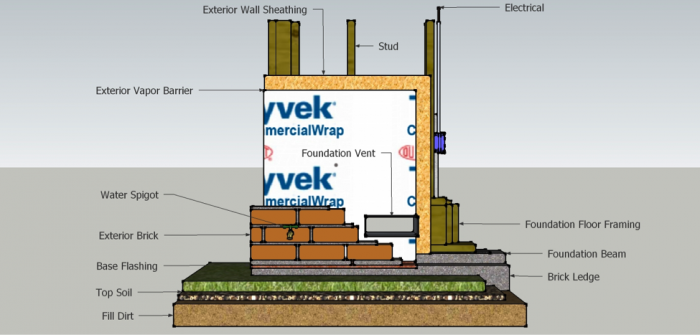
A properly built house will have several layers of protection built into the construction of the home, Most of which are required by all building codes. Some of the older homes may not have all of these items in place as they were built prior to today’s energy codes.
In most cases you will find the following layers of protection:
- Exterior brick or siding
- Vapor barrier (Tyvek is shown above – also known as house wrap)
- OSB, Fiberboard or plywood sheathing
- Interior wall framing
- Loose batten or foam insulation
- Interior drywall or other interior wall substrates or combinations of finishes & substrates
In determining if your home has “Foundation venting” walk around your house and look at the exterior walls above the visible concrete slab (Some homes are “Pier” only and do not have concrete beams). Either way there should be some type of vent opening that may have a “Vent cover” or screen over a small opening or a special brick/concrete vent. Chances are if any of these are present you probably have enough foundation venting since most builders and architects provide specifications for these vents.
If you have not found any of the above then you have no foundation venting. Again check with your local building code compliance department prior to proceeding.
If you elect to install venting you will need the following tools:
- Drill with long bit (A masonry bit will be required for brick walls)
- Saws-all or reciprocating saw and long wood cut blades
- Hammer
- Chisel
- Flashlight
- Coveralls
- Gloves
- Eye Protection
- Tape Measure
- Ruler or straight edge
- Square
If you know of a hatch or trap door in your home (Most of the time located in a closet) you may be able to access the crawl space from here.
The first step is to determine where you want the vent to be installed. In all cases you must insure that you have proper clearance both outside the house and under the house. So it is critical that you verify the possible location of the vent prior to starting this project.
A method of doing this is to gain access under the house and measure the best location from foundation wall to the center of the planned vent.
Then go outside the house and measure from the same foundation wall to the center of the planned vent.
If you noticed that there were NO plumbing, electrical or other obstructions, you now ready to drill a test hole. Using the mark you placed on the exterior of the house drill a ¼” hole all the way through the wall. Disconnect the drill power cord or remove the battery from the drill so that it cannot accidently be turned on. Return to the underside of the house and locate the drill bit. Then measure from the bit to the left, right, top and bottom of the bit to determine the size of the opening you have available. Then subtract 1-1/2” from top, bottom, left and right. (This will provide roof for framing and cutting the hole.
USE EXTREME CAUTION on the following:
- Electrical conduits or wires may be present in the wall
- Plumbing or Air Conditioner lines may be present in wall
- Rodents, spiders and other insects or animals may be in crawl space
- If you are working in crawl space this is considered a “Confined Space” and you should never enter this space without communication to someone outside the space in case of emergency
- Extreme temperatures and lack of fresh air can be present in these areas – USE CAUTION
- Do NOT move into areas that you may have difficulty in existing quickly should the need arise
- Use caution when moving since there are sharp objects above and below you
- Bump hazards are present in this tight space
If you have ruled out or prepared for all dangerous situations and are ready to proceed.

Step 3
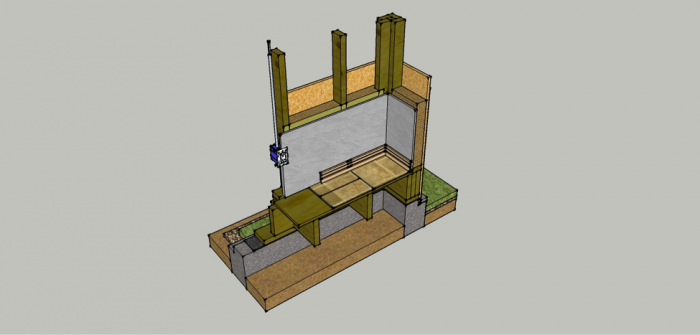
Above picture shows most common “Pier and Beam” foundations and wall designs
For the next step use the image below for reference

Step 4
When working under the house you will be in the area above the soil and beneath the floor joists. The target area for the vent will be between the floor joist and on the joist band. (In most cases the floor joists will be on 12” or 16” centers from beam to beam) this will restrict the size of the vent to the size of the space between them. A 16” inch center will provide 14-1/2” inch clear space. Since you will be deducting 1-1/2” from left right, top and bottom this will reduce the available space to 11-1/2” width, and if the “Joist band is 8” tall and you deduct 3” from that it will leave 5” height, So you end up with a 11-1/2” wide by 5” tall opening or 57-1/2” square inch vent
- Using the measurements above (Or your actual measurements available)
- Mark a rectangle spot on the joist band
- Using a ¼” drill bit hold the drill level and drill a hole through all layers of wood, once you hit the exterior brick you will need to change drill bits from wood to masonry bits. Drill a hole in each corner of the rectangle you drill. These holes will provide the exact locations for you to do the rest of the work outside the house
- Gather all of your tools and equipment and return to the outside of the house
- Examine all of the holes on the outside of the house, again ensuring that there are no obstructions in this area.
- Once you are ready to continue mark the masonry or wood siding to reflect the same rectangle shape as you did on the underside of the house.
- If the exterior of the house is wood, Use a 1” drill bit to drill a larger hole using the smaller hole as a guide. Do this in each corner of the rectangle
- If the exterior of the house is brick, using a marker draw the rectangle shape on the surface of the brick. You will now need to use the hammer and chisel to remove the grout between the brick. You may need to remove more brick than the rectangle shape to provide enough access to cut the hole. KEEP these brick as you will need to re-install them when complete
- Transfer the shape of the rectangle to the wood substrate under the brick.
- Now you are ready to cut the wood with the reciprocating saw. Insert the saw blade all the way in the wall so that the foot on the saw is in contact with the wood to be cut, Hold the saw firmly in place and begin cutting the wall following the lines you have drawn. BE CAREFULL as the saw will jump and bounce as you cut. If the saw gets in a bind unplug the saw until you can work it free.
- After you have cut the opening out use your hammer to knock the wood from the hole
- Now that you have a hole you will need to build a box out of treated wood or non-corrosive metal in the same shape and size.
- Insert the box in the opening so that it is flush with the exterior of the wall
- Using nails or screws secure the frame in place
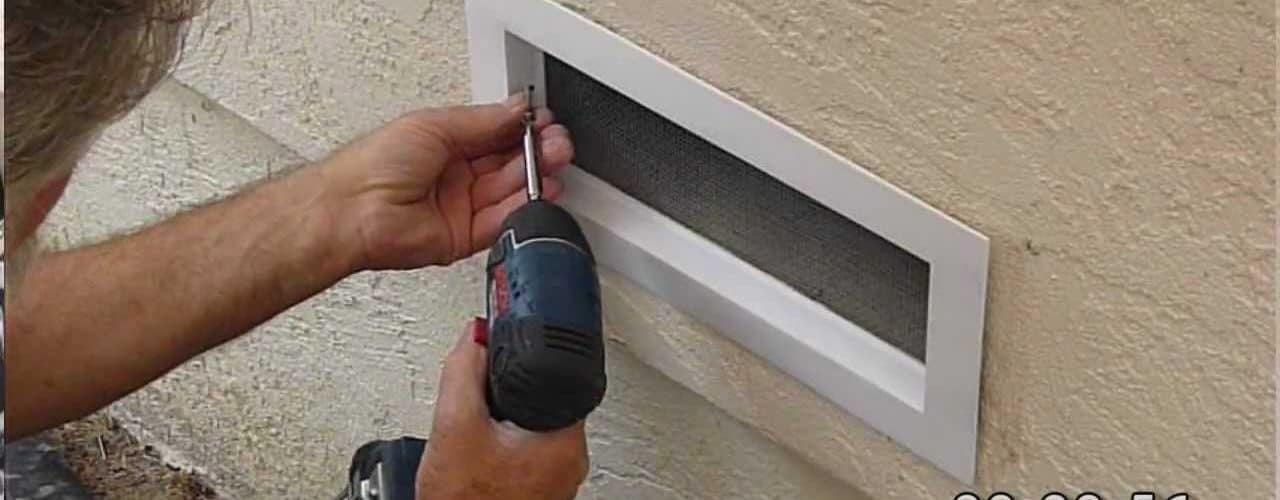
- Install screen wire over the box frame
- Install desired trim
- IF wall was brick you will need to cut the brick removed to fit the remaining gaps between the frame and the remaining brick and install mortar as needed to replace the brick.
- The number of vents required can be obtained from your local building code office. You will need to tell them how many square feet of interior space you have in the house “Living space” and let them know that you wish to install “Foundation vents” and they should be happy to provide you with the size and qty of vents you will need.
- Again it is important to check with local building code agency, and use extreme caution when completing this project. And NEVER work alone.
- If you are not comfortable in doing this project, call an expert in HVAC or Home Builder.
<>






WHAT IS THE SPACING ON THE VENTS ON A PEARING BEAM HOUSE?