
Contents
- 1 Step 1. Planning for your paved patio.
- 2 Step 2. Gather your materials, supplies and tools.
- 3 Step 3. Clearing your desired area
- 4 Step 4. Laying the foundation for the paved patio
- 5 Step 5. Laying the sharp edged sand
- 6 Step 6. Placing your edging material
- 7 Step 7. Spreading the top layer sand
- 8 Step 8. Finishing the paved patio
Step 1. Planning for your paved patio.
The first thing that you must do when you want to incorporate a paved patio into your yard is to decide where you want it placed, the size you want your patio to be and the shape you want the patio to be. You will also need to know if there are any regulations or construction permits needed in your area for building our paved patio. The local ordinance office in your area will be able to give you any information that you may need concerning these issues.
Step 2. Gather your materials, supplies and tools.
Gathering any materials, supplies and tools that you will need to complete your paved patio project prior to beginning your project will save you a great deal of time searching for them later on. To create your paved patio you will need:
- Flat bladed shovel
- Edging material
- Stiff broom
- Sharp edged sand
- Class 2 base material
- Paving stones
- Sealer
- Hose
- Vibrating plate compactor (you may need to rent one of these machines)
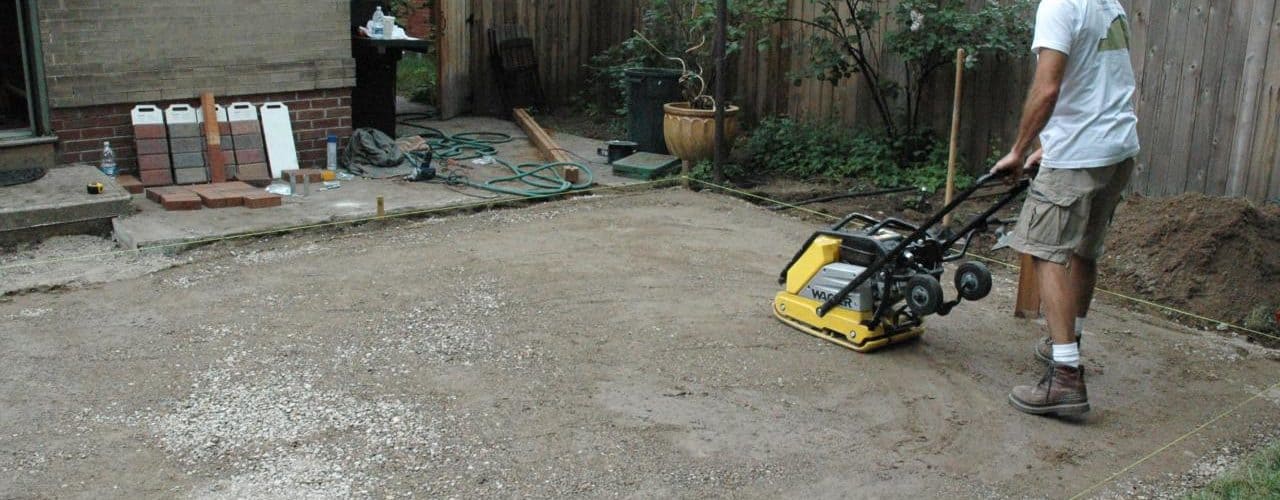
Step 3. Clearing your desired area
Using wooden stakes outline your desired area for your new paved patio area. Wind string around your wooden stakes to let others know that they should keep out of this area while you are working there. Dig out any sod and topsoil in your desired area using your flat bladed shovel. Make sure that you level the area out as you are working as much as possible. Use the vibrating plate compactor to help make the area as flat as possible and to pack down your dirt. This will help to provide the best results for your finished paved patio. When using the vibrating plate compactor start at the outside of your desired area and work inward to the middle of the working space. Make sure that you overlap the passes that you make by two to four inches. This will help to avoid missing any spots.
Step 4. Laying the foundation for the paved patio
Using your class 2 base material place a consistent layer that is two inches thick around your entire dug out area that will be used for the paved patio. The class 2 base material should contain rocks that are ¾” or smaller, dust and stones. Using the same technique in step 3 compact the class 2 base material with the vibrating plate compactor.
Step 5. Laying the sharp edged sand
Lay a one inch layer of sharp edged sand on top of the class 2 base material. Use the vibrating plate compactor to pound the sand layer down using the same methods as step 3 and 4.
Step 6. Placing your edging material
Place your selected edging material around the entire perimeter of your chosen patio area. Make sure that the edging material is secure by placing a few of your paving stones next to it to help hold it against the edge of your patio area. Place the rest of your paving stone around your desired patio area in any pattern that you may want. Remember that once these are set you cannot rearrange them. Allow enough space between each of your paving stones so that the sand will be able to settle between them.
Step 7. Spreading the top layer sand
Sprinkle the sharp edge and into the crevices between your paving stones. If you have sand on top of your paving stones carefully brush it down so that it settles into the areas around the stones. Use the vibrating plate compactor to press the paving stones down into the class 2 base material. Add more of the sharp edge sand and again compact the area. Continue repeating this step until all of the crevices around the paving stones are filled up.
Step 8. Finishing the paved patio
Use a garden hose to spray down the entire patio area. Make sure that you apply enough water to thoroughly soak through all layers of the newly laid patio. Allow this to dry completely which may take 1 or 2 days depending on the climate. When the patio is completely dry and hard you can coat it with a sealer of your choice. This will help to prevent any stains or erosion due to weather conditions.
Related Video:
Patio Pavers and Walkways-DIY
References:
DIY Network: How To Build A Paver Patio
Related Posts
<>


