People think of building fences and believe that building the fence will be easy, but the gate will be a real challenge. But this is actually not the case. Wooden gates are not difficult to build, and when you construct one yourself, you can get the exact size and design that you want to finish off your fence.
Contents
Tools Required:
Galvanized screws (3” and 2”)
Outside hinges with 1/2” lags
2x4s
Fence pickets
Latch
Tape measure
Pencil and string line
Skil saw
Hammer and drill
3” nails
1/8 drill bit
9/16 and 7/16 socket wrenches
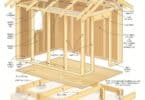
Prepare the Rails
The rails of your gate are the horizontal pieces that will run along the top and bottom of your gate. These are the first pieces you will cut. They are cut using 2×4’s, and will be the same size as your opening. You want them to fit firmly for the construction process.
On your existing fence post, mark where the rail will be. If possible, line the gate rails up with the fence rails for a visually appealing look. The gate rails should be at least 5” inches above the ground and 6” inches below the top line of the fence. If your fence is six feet tall, a third rail should be placed in the middle. The rails can be temporarily secured in place by toe-nailing through the top edges into the existing fence posts. Take care that they are close enough to the outside edge of the fence so that you can remove them when you are done. Be sure that the rails are set back the same thickness as your pickets. This will ensure a smooth look from the outside of the fence.
Cut the Brace Support
Your gate will need a knee brace between the rails. Use a long 2×4, and hold it diagonally between the two rails. The outside edge of each end should sit 3” away from either fence post. Mark this support along the bottom of the top rail and the top of the lower rail.
This support should be cut and then nailed into position. You may want to begin driving the nail into the support before you put it in place. The brace should be firmly attached to the top and bottom rails.
Attaching the Pickets
Using the existing fence as a guide, permanently attach a picket on the hinge side. On the latch side, attach another picket temporarily. Screw them into place using 2” screws. Hammer a nail into the top of each picket, and then stretch a string line between them. Continue attaching pickets, using the string line as your height guide. When you are ready to adjust the temporary picket next to the latch, create a 3/4” space next to the latch post. If you only need a partial picket here, you can use a table saw to rip one to the proper width.
If you are making your gate the same size as your fence, you might want to trim a few inches off the bottom of your gate pickets. This will allow your gate to open easily over grass or walkways.
If you want the gate to rise slightly above your fence, leave some extra height at the top so that you can cut it to the desired shape after assembly.
The Hinges
After removing your string guide, you can pre-drill for your hinges. You should use 8+ inch hinges with ½” lags for the greatest strength and durability. Once the hinges are attached at top and bottom, you can remove your temporary toenails from the inside of the gate.
Adjusting the Gate
Gently open the gate, and then use the Skil saw to carefully cut ¾” from the latch side of the gate. You are now ready to install your latch and enjoy your gate.
<>