A computer desk can be a useful and functional element of any room. Most people choose to purchase either completed completed computer desks or premade desk kits. However, it is not too difficult to make a desk capable of holding your computer and providing workspace if you are willing to spend some hours in construction and assembly. You will have the satisfaction of a job done with your own hands, a design of your choosing, and substantial savings over a desk you would otherwise have purchased from a store. A homemade computer desk may be built with modest carpentry skills, some wood, and screws. The cost of your desk will depend on the woods you purchase, as well as on the number of tools you have available. However, it is still likely to cost substantially less than that of a store bought desk. It is also probable that your desk will look much better! Let’s get started.
For this particular project, you will need the following tools and building materials. A half inch thick plank of wood will be used for the top of your computer desk. Another plank will be necessary for use as a keyboard tray. Also obtain a third half inch thick wooden plank. To glue the wood, you will need wood glue.
You will also need sand paper or an electric sander, a level, a pencil, a power drill with screwdriver attachments, a ruler or tape measure, wood stain and varnish (and brushes for the wood varnish), numerous screws, L-brackets, locking nuts and carriage bolts, keyboard runners, and finally, scrap wood for the leg braces. You can find all of these bits of equipment at your local hardware store.
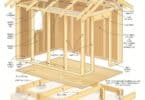
Once you have the necessary equipment, the first step is to design the desk. This is not complex; you will have a top surface, a keyboard area, and the legs of the desk. The primary difference between most computer desks is the size of the top desk. If you simply want room for your desktop computer, you will not need much top surface space. However, if you would like a printer, you will need more space. Decide this beforehand. Don’t forget to take into account the space where you’ll put the desk.
Next, grab your wood and cut it to the desired sizes. If you use the correct angles, you may be able to cut the legs from the same plank of wood. Pay attention to the width of the keyboard desk and that you leave enough space for the keyboard runners.
Use your sander or sandpaper to sand every wood piece; they should be smooth. If you have a power sander, it will take less time, but sandpaper will work too.
Use L brackets, locking nuts, and carriage bolts to attach your desk legs to the top surface. There will probably be wobbles; use your measuring device to measure diagonals between the legs and top surface and create anchors spanning the space from your scrap wood. Screw everything in tightly.
Attach the runners for the keyboard with the smaller wood plank. Screw everything in tightly. You may wish to attach a piece of wood behind the drawer to prevent the keyboard from falling out behind the desk. Check the sitting height so hands are not stained when typing. Stain the wood, then varnish it with at least two coats. Once everything is dry (give it 24 hours), you have finished!
Additional Information:
Simplified Building: How to Build a Custom Ergonomic Computer Desk
<>